Notification
Notifications gateway providers allow you to send notifications based on events in Merchello. An popular notification is to send an email to a customer when the customer has completed the checkout process.
Example Usage
Once you have activated a provider, you can now go and set up the provider. Click on the tab which is the type of provider you have activated.
In our case, it was the SMTP provider which is of type 'Notification'. On the right you can see the link 'Add Notification'. Click the link and you'll see 'Email Notification', choose Add and give it a name (i.e. Order Notifications) and a description (Optional).
To configure the Order Confirmation, click on the + icon and you'll see some events we can hook into. We want the first one 'Order Confirmation Message (Pattern Replace)'. Add your Subject, From Email Address and (Optional) description.
Lastly, let's configure the actual message the we'll send. Click on the edit/pencil icon next to your email address. And you'll get a tab with all the final options for this provider. Here you can choose to whom you send the order confirmation and the actual message.
As this message is a 'Pattern Replace' we can pull out data from the order using a pattern like we use in AngularJs to display data i.e. {{BillToName}} or {{PaymentAmount}}
A full list of the items we can use are listed in the Merchello.config and it's always best to check there for the most recent items. Below is a list at the time of writing this documentation.
<patternFormatter>

        <!-- patterns to search and replace can be

          <replace alias="Company" pattern="{{Company}}" replacement="Merchello" replacementInMonitor="false" />
          -->

        <!--
          Depending on the model passed to the "Monitor" responsible for populating the replacements, some of these values will be empty.  For example,
          a MonitorModel that only contains shipment information will not be able to populate Billing information ...
          -->

        <!-- INVOICE -->
        <replace alias="InvoiceKey" pattern="{{InvoiceKey}}" />
        <replace alias="InvoiceNumber" pattern="{{InvoiceNumber}}" />
        <replace alias="InvoiceDate" pattern="{{InvoiceDate}}" />

        <replace alias="InvoiceStatus" pattern="{{InvoiceStatus}}" />
        <replace alias="TotalDiscountPrice" pattern="{{TotalDiscountPrice}}" />
        <replace alias="TotalShippingPrice" pattern="{{TotalShippingPrice}}" />
        <replace alias="TotalCustomPrice" pattern="{{TotalCustomPrice}}" />
        <replace alias="TotalTaxPrice" pattern="{{TotalTaxPrice}}" />
        <replace alias="TotalItemPrice" pattern="{{TotalItemPrice}}" />
        <replace alias="TotalItemPlusCustom" pattern="{{TotalItemPlusCustom}}" />
        <replace alias="TotalPrice" pattern="{{TotalPrice}}" />

        <!-- ADDRESS -->
        <replace alias="BillToName" pattern="{{BillToName}}" />
        <replace alias="BillToAddress1" pattern="{{BillToAddress1}}" />
        <replace alias="BillToAddress2" pattern="{{BillToAddress2}}" />
        <replace alias="BillToLocality" pattern="{{BillToLocality}}" />
        <replace alias="BillToRegion" pattern="{{BillToRegion}}" />
        <replace alias="BillToPostalCode" pattern="{{BillToPostalCode}}" />
        <replace alias="BillToCountryCode" pattern="{{BillToCountryCode}}" />
        <replace alias="BillToEmail" pattern="{{BillToEmail}}" />
        <replace alias="BillToPhone" pattern="{{BillToPhone}}" />
        <replace alias="BillToCompany" pattern="{{BillToCompany}}" />

        <replace alias="ShippedDate" pattern="{{ShippedDate}}" />
        <replace alias="ShipToAddress1" pattern="{{ShipToAddress1}}" />
        <replace alias="ShipToAddress2" pattern="{{ShipToAddress2}}" />
        <replace alias="ShipToLocality" pattern="{{ShipToLocality}}" />
        <replace alias="ShipToRegion" pattern="{{ShipToRegion}}" />
        <replace alias="ShipToPostalCode" pattern="{{ShipToPostalCode}}" />
        <replace alias="ShipToCountryCode" pattern="{{ShipToCountryCode}}" />
        <replace alias="ShipToName" pattern="{{ShipToName}}" />
        <replace alias="ShipToEmail" pattern="{{ShipToEmail}}" />
        <replace alias="ShipToPhone" pattern="{{ShipToPhone}}" />
        <replace alias="ShipToOrganization" pattern="{{ShipToOrganization}}" />
        <replace alias="ShipToName" pattern="{{ShipToName}}" />
        <replace alias="TrackingCode" pattern="{{TrackingCode}}" />
        <replace alias="ShipMethodName" pattern="{{ShipMethodName}}" />
        <!-- ITERATING THROUGH LINE ITEMS -->


        <!-- LINE ITEMS
        these must be between the IterationStart[Invoice.Items] and IterationEnd[Invoice.Items] so they get repeated in the iteration -
        the pattern is then dynamically changed to

        Item.Sku.0 - Item.Name.0 - Item.Price.0 ...
        Item.Sku.1 - Item.Name.1 - Item.Price.1 ...
        Item.Sku.2 - Item.Name.2 - Item.Price.2 ...

        before the formatter performs it's replacements the message
        -->
        <replace alias="LineItemSku" pattern="{{Item.Sku}}" />
        <replace alias="LineItemName" pattern="{{Item.Name}}" />
        <replace alias="LineItemUnitPrice" pattern="{{Item.UnitPrice}}" />
        <replace alias="LineItemQuantity" pattern="{{Item.Quantity}}" />
        <replace alias="LineItemTotalPrice" pattern="{{Item.TotalPrice}}" />

        <!-- PAYMENT -->
        <replace alias="PaymentMethodName" pattern="{{PaymentMethodName}}" />
        <replace alias="PaymentAmount" pattern="{{PaymentAmount}}" />
        <replace alias="PamentReferenceNumber" pattern="{{ReferenceNumber}}" />

    </patternFormatter>
How to create a Custom Notification Provider
Merchello Notifications allow you to send email, twitter, or other information posts based on triggered events. An example of a notification is for a customer to receive an email confirming a placed order or processed credit card sale.
While there are a few standard events (new order) and notifications (SMTP/email), Merchello allows you to build your own to fit your unique business needs.
The Custom Notification Gateway
In this example, I will build a custom SMTP/email-based notification that sends email when a new product is added to the catalog. The email is sent to both warehouse personnel and the sales team alerting them to the new product.
This notification doesn't create new information but uses existing information (the new product) in Merchello to fulfill the notification event.
Development Tasks
The first task is create the class library for the sample notification gateway. Once the library is created and its gateway code is completed and built, the class library will be added to the website.
Test Tasks: BackOffice
The first test task is to prepare the Back office.
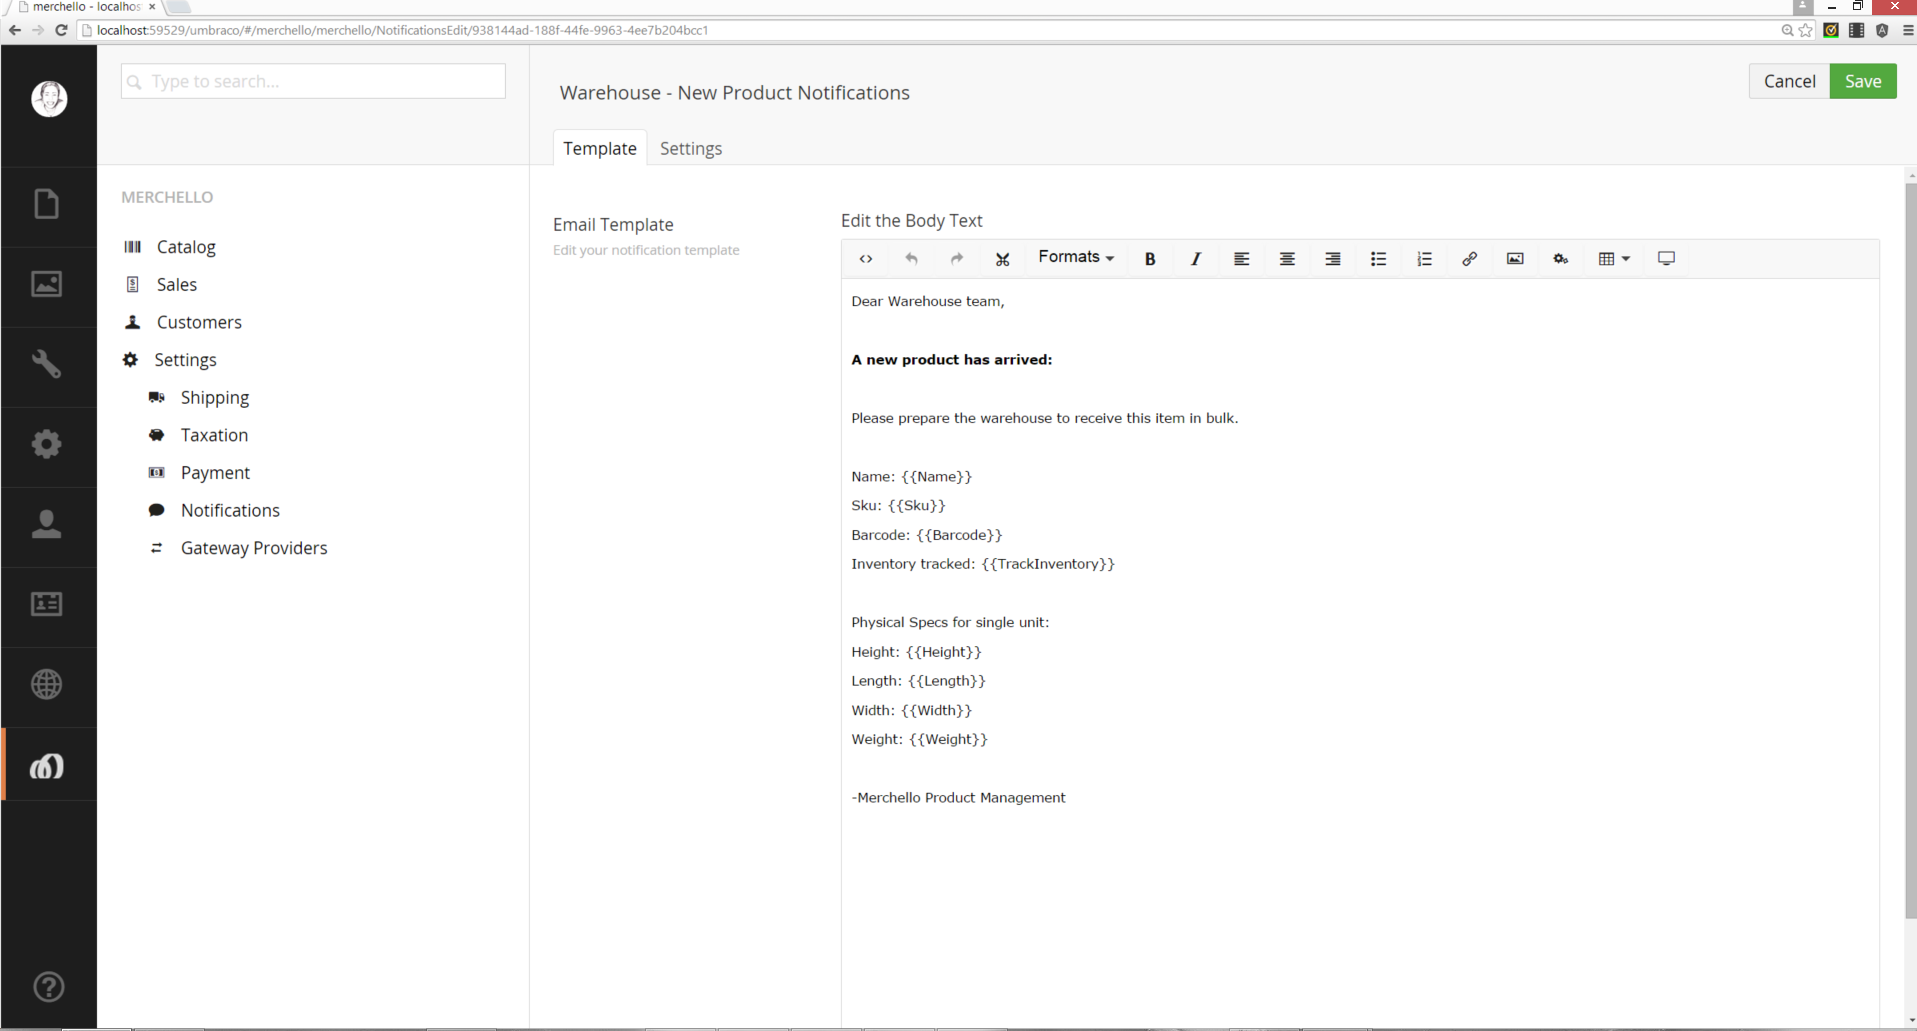
Modify the Back office to activate the SMTP notification gateway, then add notification messages for the new event (new product) to both sales and warehouse personal. The email template will include replaceable strings with double curly brackets . When the new product event is triggered, the replaceable strings will be replaced with the properties of the new product.
Test Tasks: Trip the Notification Event
The next test task is to use the Back office - tripping the trigger to send the emails. Create a new Merchello product. Make sure to fill in the following properties when you create the product:
Name
Sku
Barcode
TrackInventory
Height
Length
Width
Weight
These properties are used in the email template. These are not all the Product properties so more could have been added to the email because they are in the monitor replacement code. However, I choose not to include them.
Considerations for your own Custom Notification
In this example, I rely heavily on Merchello. The event is for new Merchello product created in the Back office and the notification information is from the new product object. This made the sample quick and easy.
Your situation may be more complex with your own event and your own information. The trigger can be tripped at any time, and any object can be passed into the monitor.
If you just need to send email in a random spot of the website, feel free to use whatever SMTP framework you already have in place. Merchello notifications don't need to be used in that situation, but they are an option -- albeit a more complicated one.
Visual Studio Solution Organization
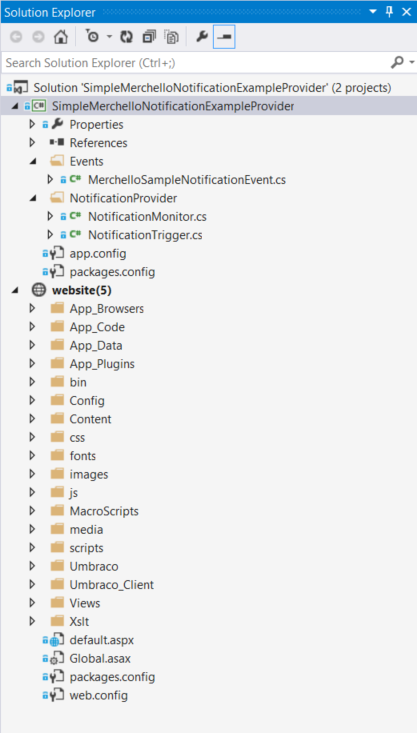
For this example, you will want to create a Class Library project. The class library BIN directory will need to have all the Umbraco and Merchello dlls from the website.
In the example code for this document, you will see a Visual Studio solution, with 2 projects. The first project is the class library. The second project is one of the sample Umbraco/Merchello websites.

Add the class library as a reference to the website project. For this example, that is all you need to add the sample shipping gateway to the Merchello website. When you change and build the shipping gateway, the changes are encapsulated in the dll that is updated in the website's /BIN directory.
Make sure the website is set as the Startup Project.
Simple Configurations For This Example
Just adding a reference of the class library to the website skips several steps that you may want to go back and engineer to have a more durable project. The first is to wrap the addition of the class library (and any associated client-side files) into an Umbraco package.
Client Library
For the notification provider class library, you need 3 classes.
| Class | Inherits From | Purpose |
|---|---|---|
| NotificationEvent | Umbraco.Core .ApplicationEventHandler | Register event to listen for, pass new product info to monitor for string replacement - converting template into email |
| NotificationTripper | Merchello.Core.Gateways .Notification.Triggering .NotificationTriggerBase | registers trigger name and passes object from event to monitor |
| NotificationMonitor | Merchello.Core.Gateways .Notification.Monitors .NotificationMonitorBase | Manage the replacement pattern for email |
Event class
Start building the class library by registering the event and passing an object through the event. In this example, I selected the Saving event on the ProductService. When the saving event is triggered, the new product's information is passed through.
More than just new products can use the Saving event, so I use the HasProperty check to make sure I'm only firing off the notification trigger if the product does not have an existing identity.
Notice the name "ProductAdd" of the trigger in this class is the same as the name in the class trigger class further down.
MerchelloEvents::ProductService_Saving
namespace MerchelloNotificationExampleProvder.Events
{
    using System;
    using System.Linq;

    using Merchello.Core;
    using Merchello.Core.Events;
    using Merchello.Core.Models;
    using Merchello.Core.Services;

    using Umbraco.Core;
    using Umbraco.Core.Events;
    using Umbraco.Core.Logging;

    public class MerchelloEvents : ApplicationEventHandler
    {
        protected override void ApplicationStarting(UmbracoApplicationBase umbracoApplication, ApplicationContext applicationContext)
        {
            // register event
            ProductService.Saving += ProductService_Saving;
        }

        void ProductService_Saving(IProductService sender, SaveEventArgs<IProduct> e)
        {
            foreach (var product in e.SavedEntities)
            {
                // new products only
                if (!product.HasIdentity)
                {
                    // trigger event, pass product
                    Notification.Trigger("ProductAdd", product);
                }
            }
        }
    }
}
Now that the event is wired up, we need something to do when it fires.
Trigger class
The trigger class's purpose is to be invoked by the invent and then notify the monitors. If you wanted to change this class for your own purposes, all you would need is a new class attribute decoration value for "TriggerFor" and a new object model to pass on such as IProduct.
In this version of Merchello, the second parameter of contacts is not used since the email contacts are set in the message in the Back Office. You could have also chosen to pick an object that contains an email address or list, or you could use the contacts list passed through.
ProductAddTrigger class
namespace MerchelloNotificationExampleProvder.NotificationProvider
{
    using System;
    using System.Collections.Generic;
    using System.Linq;
    using System.Text;
    using System.Threading.Tasks;

    using Merchello.Core.Gateways.Notification.Triggering;
    using Merchello.Core.Observation;
    using Merchello.Core.Models;

    [TriggerFor("ProductAdd", Topic.Notifications)]
    public class ProductAddTrigger : NotificationTriggerBase<Merchello.Core.Models.IProduct, Merchello.Core.Models.IProduct>
    {
        protected override void Notify(Merchello.Core.Models.IProduct product, IEnumerable<string> contacts)
        {
            this.NotifyMonitors(product);
        }
    }
}
Monitor class
The real work is in the monitor class. This is where you replace strings in the email. The class decoration attribute contains a unique guid, the trigger class and the string that appears in the back office to create the message. Notice that the same IProduct is based from the event, through the trigger, and now to the monitor.
The code below is cherry-picking which properties of IProduct I want to pass through to the email template. You can add all or just a few or create a link with an ID that goes back to the website with information.
ProductAddMonitor
namespace MerchelloNotificationExampleProvder.NotificationProvider
{
    using System.Collections.Generic;
    using System.Linq;
    using Merchello.Core.Formatters;
    using Merchello.Core.Gateways.Notification;
    using Merchello.Core.Gateways.Notification.Monitors;
    using Merchello.Core.Observation;
    using Merchello.Core.Models;

    [MonitorFor("B829266B-B585-4CA2-BCCB-4EBCEE045114", typeof(ProductAddTrigger), "Product Add Message (Pattern Replace)")]
    public class ProductAddMonitor : NotificationMonitorBase<IProduct>
    {
        public ProductAddMonitor(INotificationContext notificationContext)
            : base(notificationContext)
        {
        }

        public override void OnNext(IProduct value)
        {
            if (!Messages.Any()) return;

            var patterns = new Dictionary<string, IReplaceablePattern>()
            {
                { "Name", new ReplaceablePattern("Name", "", value.Name.ToString()) },
                { "TrackInventory", new ReplaceablePattern("TrackInventory", "", value.TrackInventory.ToString()) },
                { "Barcode", new ReplaceablePattern("Barcode", "", value.Barcode) },
                { "Sku", new ReplaceablePattern("Sku", "", value.Sku) },
                { "Height", new ReplaceablePattern("Height", "", value.Height.ToString()) },
                { "Length", new ReplaceablePattern("Length", "", value.Length.ToString()) },
                { "Width", new ReplaceablePattern("Width", "", value.Width.ToString()) },
                { "Weight", new ReplaceablePattern("Weight", "", value.Weight.ToString()) }
            };

            var formatter = new PatternReplaceFormatter(patterns);

            foreach (var message in Messages.ToArray())
            {
                // send the message
                NotificationContext.Send(message, formatter);
            }
        }
    }
}
Now that the 3 classes are connected, build the class library, make sure the website is set as the start project and debug.
Back Office Setup for Customer Notification Event
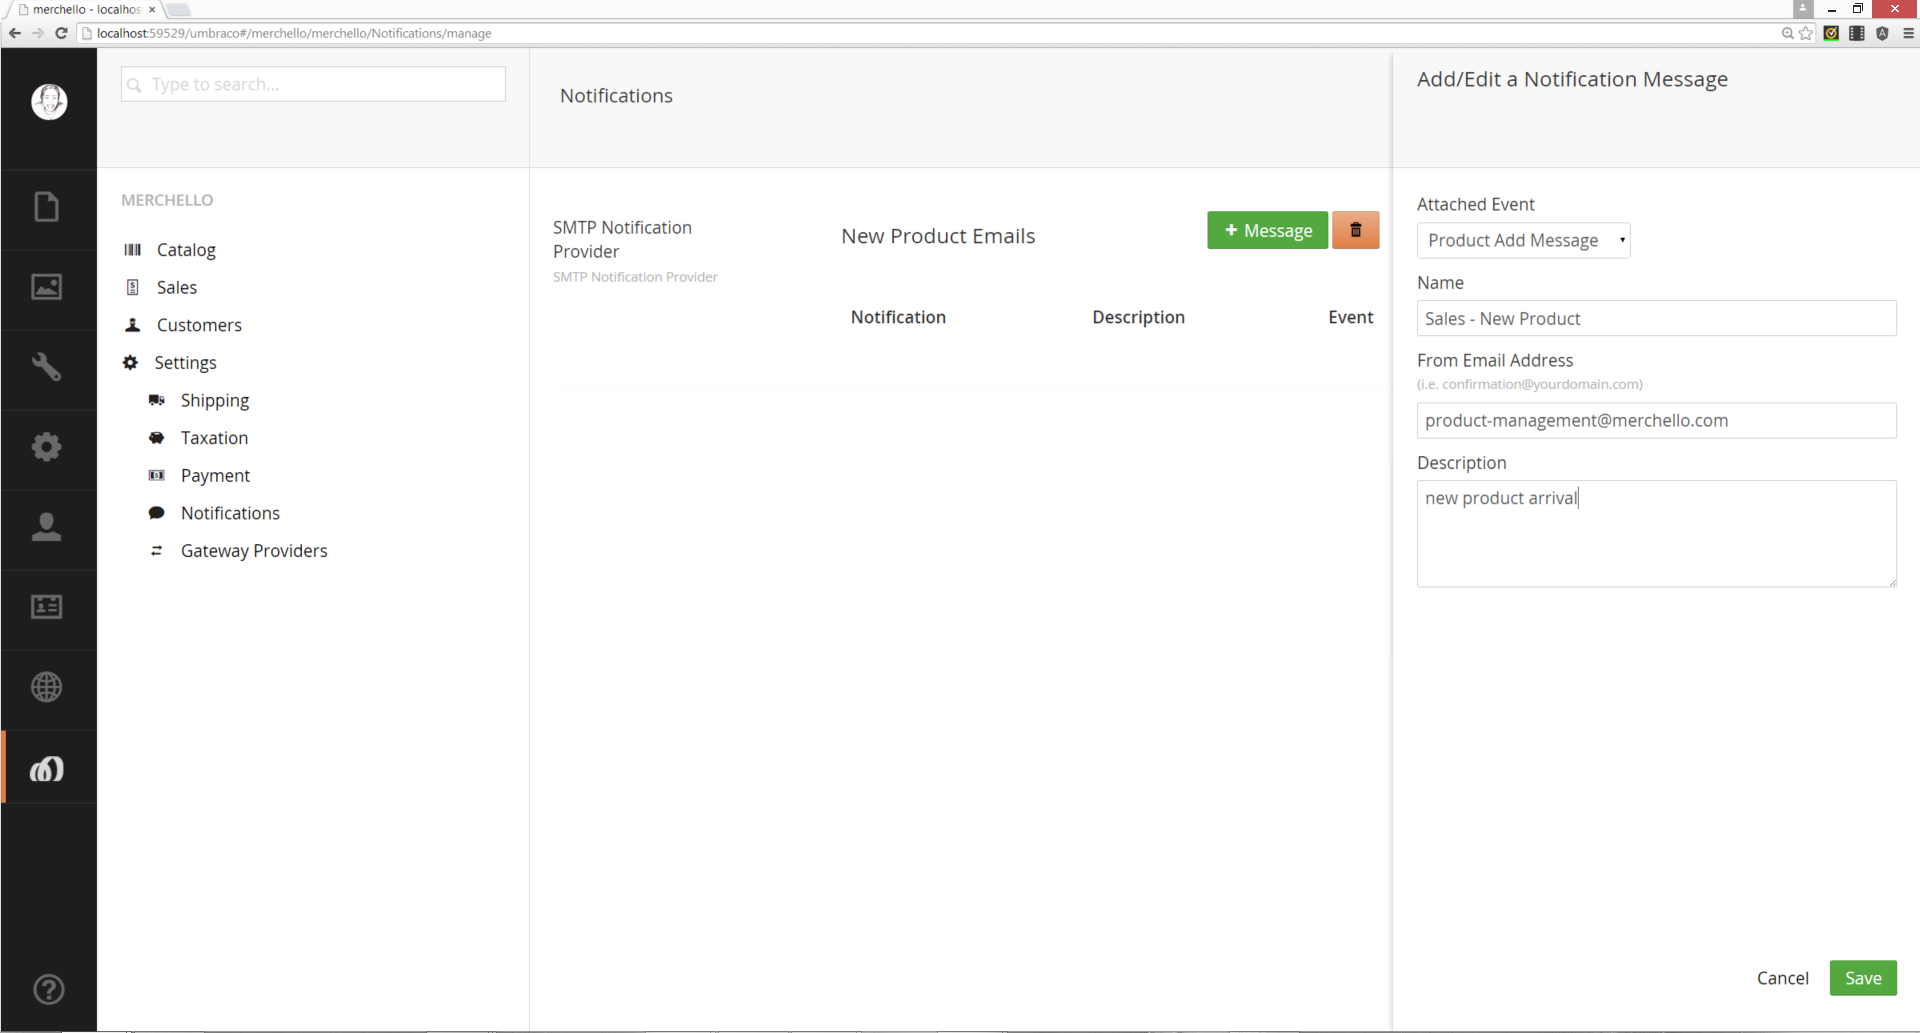
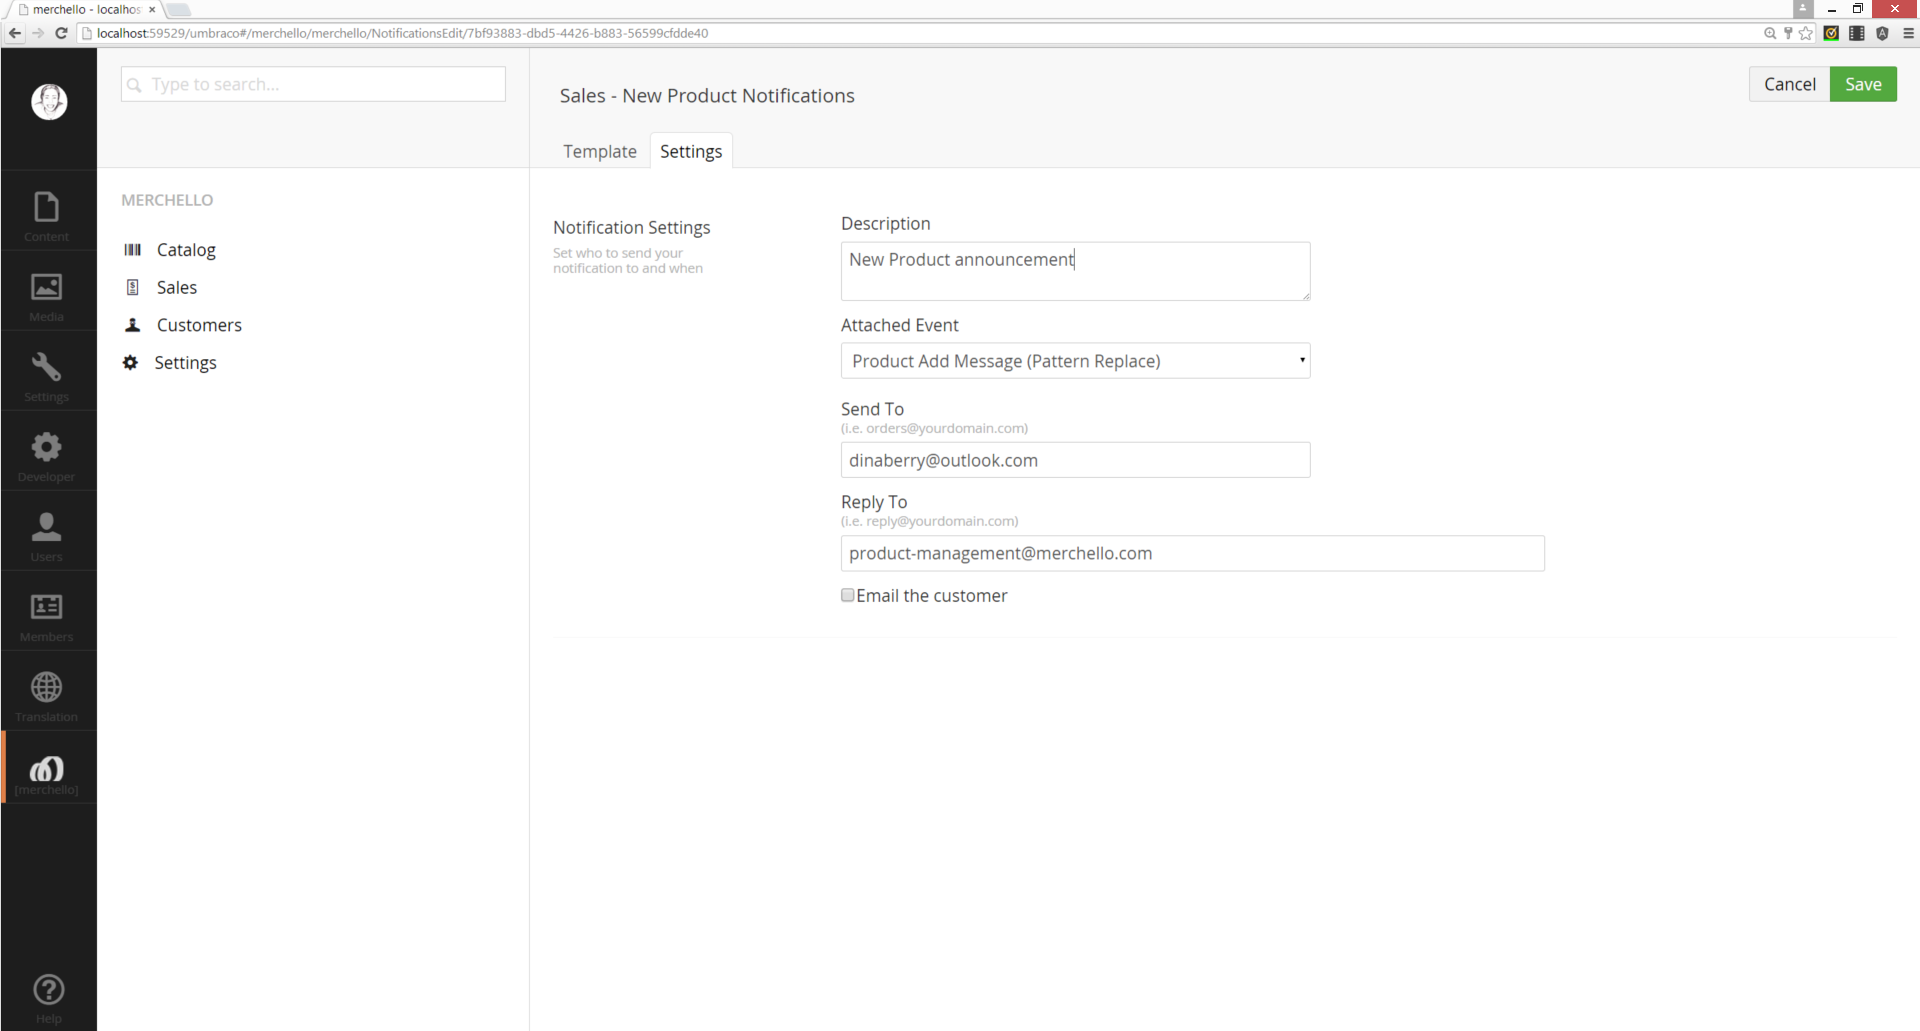
Still in the Merchello back office, go to Settings/Notifications. Add a new notification and name it "New Product." This is a category name for all messages created under this category. Add a message and select the new event "Product Add Message," which was the name in the class attribute "MonitorFor."
For the first message, name it "Sales - New Product," and save. Create a second new message and name it "Warehouse - New Product."

The only difference for these two messages is where it is going (the email address) and what it says (the template). The sales team probably doesn't need to know product measurements but the warehouse team definitely does need to know those to prepare a space in the warehouse.


Ready to Test
The custom notification is coded up the class library and built into the website via a reference. The notification gateway is enabled and a notification message has been built on that custom trigger event. Now we are ready to test.
Create a New Product
In the Merchello back office, in the catalog, create a new Product. Save the product. You just triggered the event and you should now have two emails.
Local SMTP Server: SMTP4Dev
While working on email notifications, I looked for a local smtp to install and test. I looked at several but wanted something that didn't let the emails leave my development machine. I settled on SMTP4Dev which has both the source code and the install available from CodePlex. On my Windows 8.1 machine, it works well.
Updated less than a minute ago
